# The DVA Code
# Still Growing Here!

Great things also grow from cabbage and turnips! The developer section is still under construction. Structure, content, and design are continuously being optimized.
This area is for internal use only until completion. A complete overhaul is in progress.
# Software Architecture
Deployment upon production start
# Servicecommunication
# Backend-Webservices:
# Hardware Architecture (structural recommendation)
Deployment upon production start
# Deployment, Operation, and Maintenance
# DVA Frontend
The DVA frontend code is based on the Masterportal (opens new window) for which various add-ons were created within the project. It also includes further dependencies [Link to list in documentation].
The repository for the DVA frontend code can be found in the repository of the Professorship of Geoinformatics at TU Dresden: DVA FE Repo (opens new window)
# Setting up the Local Development Environment
Download the DVA FE Repo (opens new window)
Install Node.js (opens new window)
Install the Node Package Manager (NPM) (opens new window) with
npm install -g npmIf necessary, use the Node Version Manager (opens new window) to set the correct versions (see note and details below)
In the repository path in the terminal:
npm run startNote on Node and NPM Versions
The development environment of the Masterportal requires specific versions of Node.js and NPM. In this case, these are the following versions:
- Node: 18.16.0 or 20.12.2
- npm: 9.5.1 or 10.5.0
These versions are best managed using the Node Version Manager (opens new window).
Instructions for managing the versions for the local development environment can be found in the details:
# Data Server
The database server, called Data-Server (PU_VM_dva_data), stores, manages, organizes, and structures the data of the DVA.
The data server primarily relies on the interplay of the following applications:
- Geoserver
- Plugin: Geostyler
- PostGIS
The Data-Server is accessible via:
- geoserver.dva.geo.tu-dresden.de (opens new window)
Access credentials are managed via the central password database entryPU_VM_dva_data_Geoserver. - IP (see central password database)
Access credentials for the data server are stored under PU_VM_dva_data_PostGIS_DB in the password database. The data server is used in the following locations:
Via the DVA Web App:
- Frontend via WFS (embedded through the master portal code)
ToDo
Insert link:
- For the documentation of the FE code at the point where the WMS is integrated
- Access to WFS via Geoserver (it may be useful to create separate documentation for this)
- Backend for calculations and simulations
ToDo
Insert link: To the BE code documentation and relevant interfaces to the PostgreSQL database
Through other connections:
# Establishing a Database Connection via ArcGIS
Prerequisite: ArcGIS Pro (opens new window) must be available.
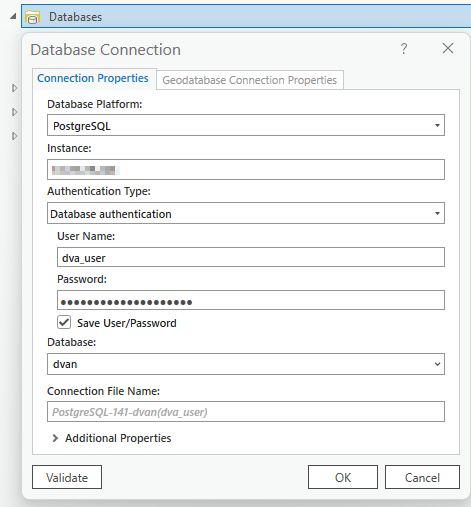
- After launching ArcGIS Pro, open the Catalog section.
- Right-click on
Databasesand selectNew Database Connection. - In the dropdown under Database Platform, select PostgreSQL.
- In the
Instancetext field, enter the name or IP address of the database cluster on the server where PostgreSQL is installed. - For
Authentication Type, selectDatabase authentication. - Enter
User NameandPassword. Credentials are managed via the central password database underPU_VM_dva_data_PostGIS_DB. - Depending on the project, the database may vary. Currently, there is only the
dvandatabase, which contains various data on population and infrastructure for the Federal Republic of Germany. The data source is OSM data, and it does not reflect the official infrastructure situation.
ToDo
Insert link: To database documentation | If created, the second part of point 7 may be removed.

Fig: Database connection inputs in ArcGIS, example of the DVAN DB on the DVA Data Server
Upon successful connection, the view should look like this:
# Database Connection via PGAdmin
Prerequisite: PGAdmin (opens new window) must be available.
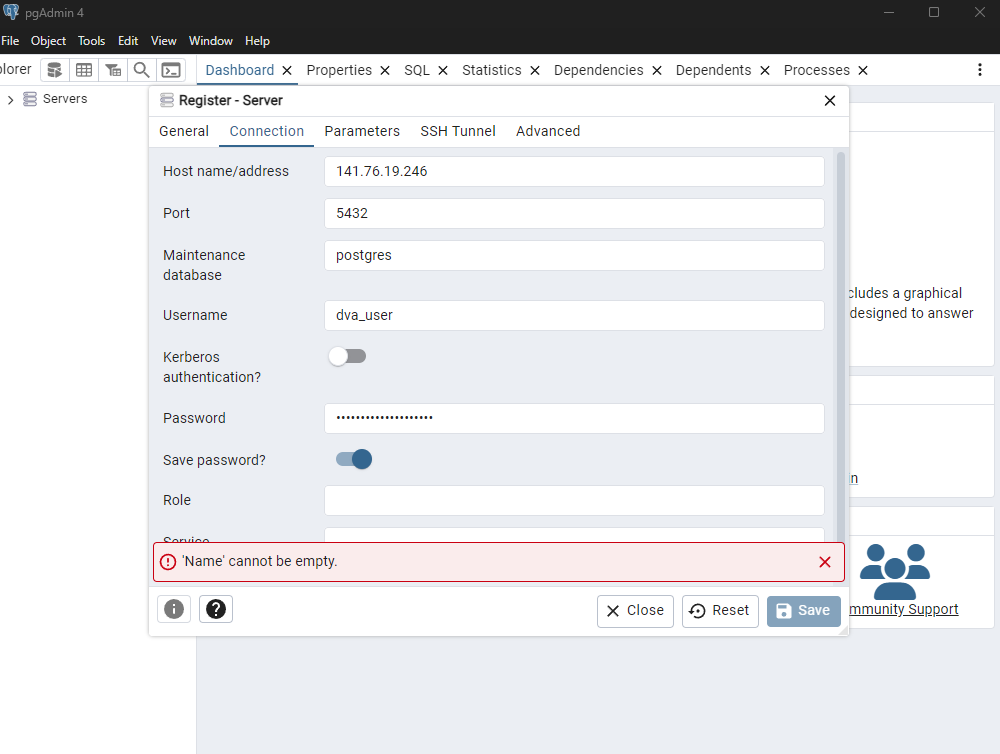
- After launching pgAdmin, right-click on
Serversin the object explorer. - In the new window
Register - Server, enter a name for the server underName. It is preferable to call it DVA. - Switch to the Connections tab in the same window.
- In the Host name/address text field, enter the name or IP address of the server where PostgreSQL is installed. Enter
5432underPort. - Enter
UsernameandPassword. Credentials are managed via the central password database underPU_VM_dva_data_PostGIS_DB. - Depending on preference, the
Save password?option can be enabled or disabled. - Click
Save. - The database used may vary depending on the project. Currently, there is only the
dvandatabase, which contains various data on population and infrastructure for the Federal Republic of Germany. The data source is based on OSM data, and it does not reflect the official infrastructure situation.

Fig: Database connection inputs in PGAdmin, example of the DVAN DB on the DVA Data Server
Upon successful connection, the view should look like this:
# Establishing a Database Connection via Geoserver
Prerequisite: Access to the DVA Data Server or the DVA Geoserver (opens new window) is required. Access credentials are managed via the central password database entry PU_VM_dva_data_Geoserver.
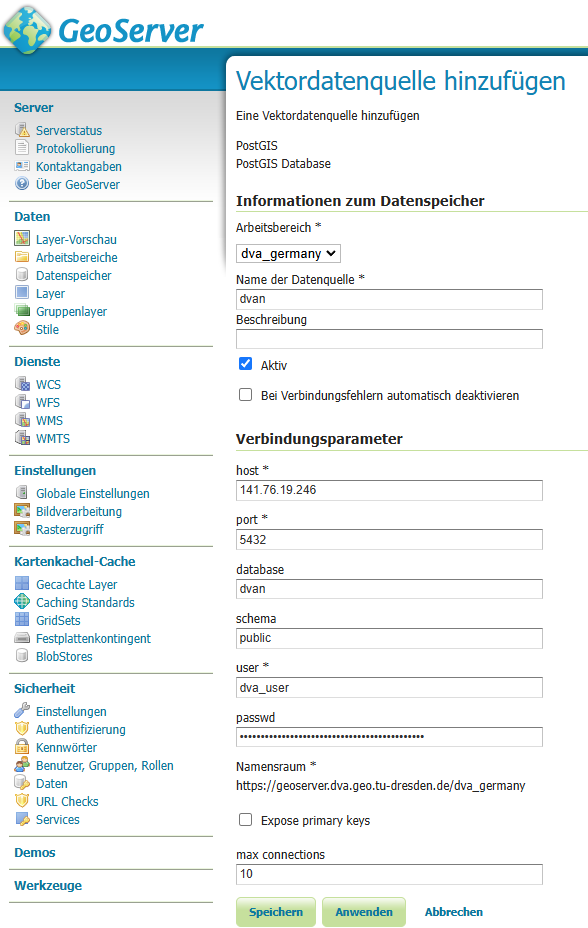
- After logging into the DVA Geoserver (opens new window), go to
Data→Data Storesin the left navigation bar. - Click
Add Data Store. - Under
Vector Data Sources, selectPostGISto add a PostGIS database. - In the
Workspacedropdown, selectdva_germany, for example. - Assign a name to the data source (currently dvan).
- Under
Host, enter the IP address of the data server and underPort, enter5432for the PostGIS database. - The
Databaseisdvan, and theSchemaispublicby default. - Enter
UserandPassword. Credentials are available via the central password database underPU_VM_dva_data_PostGIS_DB. - Additional settings can be configured if needed. For initial operation, the default values are sufficient.

Fig: Database connection inputs in Geoserver, example of the DVAN DB on the DVA Data Server
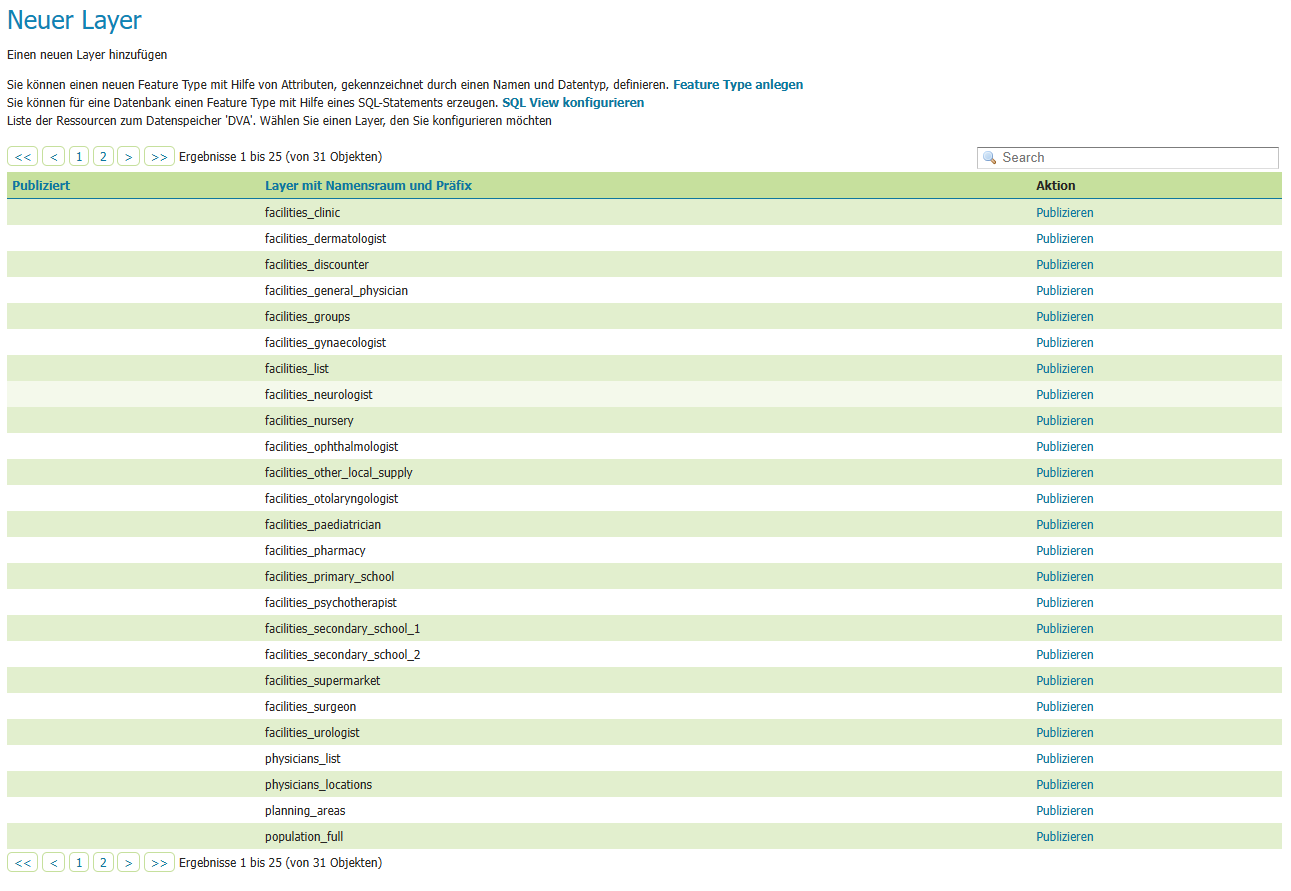
In the left navigation bar under Data → Layers, the layers of the dva_germany workspace can be viewed and published.

Fig: Upon successful connection, the view should look like this
# Geostyler Plugin for Geoserver
To install the Geostyler plugin, ensure that GeoServer is properly installed and running.
- Navigate to the GeoServer installation directory and then to
/WEB-INF/lib/.- This folder manages and installs plugins.
- In this example, access is made via WinSCP:
/var/lib/tomcat9/webapps/geoserver/WEB-INF/lib/
Download the
.jarfile gs-geostyler (opens new window).Copy the file (e.g., using WinSCP) to the directory from step 1 (the actual path may vary).
Restart the GeoServer instance.
# Publishing Layers in GeoServer
Access to the DVA Data Server or the DVA GeoServer (opens new window) is required. Login credentials are available through the central password database under PU_VM_dva_data_Geoserver.
- After logging in to the DVA GeoServer (opens new window), navigate to
Data→Layersin the left navigation pane. - Click
Add Layer. - If not already done, add a new data source under
Vector Data Sources→PostGIS. - Select the desired data store from the dropdown, e.g.,
dva_germany. - A list of the layers contained will be displayed (for the data source
dva_germany, this is the connection to the PostGIS tables). - Select the desired layer and click
Publish. - Under the
Datatab:
- Set a
NameandTitle. - Keep the coordinate reference system if no changes are needed.
- Calculate the bounding box:
- Click
Calculate from the coordinate reference system bounds. - Click
Calculate from the native bounds.
- Click
- Click
Save.
The layer is now published in GeoServer.
- Under
Data→Layers, all published layers can be viewed. - Under
Data→Layer Preview, the layers can be viewed as an OpenLayers preview.
More information on styling a layer can be found in the section Styling Layers (with Geostyler).
# Styling Layers (with Geostyler)
# Styles for facilities:
# DVA Database and Tables
# Schema Documentation
This section provides an overview of the database schema, including tables, columns, data types, and other relevant constraints.
# Population Tables
# Table: population_full
A table for storing nationwide population data with geometry and age distributions in 10-year intervals.
This schema describes the population_full table, which contains resident population data based on the 2011 census and spatial data (in the form of a polygon with a 100m x 100m grid).
# Table: population_standard
A table for storing nationwide population data with geometry and age distributions. It differs from population_full in the classification of age groups, which here are divided into life-biographical age groups.
This schema describes the population_standard table, which contains resident population data based on the 2011 census and spatial data (in the form of a polygon with a 100m x 100m grid).
# Infrastructure Tables
# Table: facilities_[Name]
Tables for storing nationwide infrastructure data of various types with geometry data (Point), including a weighting factor that provides information about the capacity limits of the infrastructure. In the absence of nationwide capacity information, these data are simulated. Depending on the data owner, they can be replaced by real data. Data source: OSM data
The following infrastructure types are stored in this format:
The table schema is as follows:
# Management Tables
# Table: users
This table governs external users' access to the DVA frontend. Access is only possible after contacting the responsible persons at TU Dresden.
# Services
This section provides an overview of the services that are in use for the operation of the DVA.
# WMS of the GeoServer
# Useful Console Statements
# Docker
Docker is used in the DVA application landscape to deploy services (including frontend and databases). For deployment, operation, and maintenance, it is essential to start and reload containers. Frequently used statements are listed below:
# Show running containers and VM load:
# Display running containers and VM utilisation:
sudo docker stats
# Stop running containers
sudo docker compose stop
# Start container (in the folder directory in which the Docker-compose.yml is also stored)
sudo docker compose up -d --build
# Show logs
sudo docker logs "containername" -f
# No more memory and Docker won't start?
This shows the free storage space on all file systems:
df -h
# Clean up temporary Docker data on the VM
Docker stores a lot of temporary data such as images, containers, volumes and networks. This data can be cleaned up to free up storage spac
sudo docker system prune -a
# Display the port configuration of the running containers:
sudo docker container ls --format "table {{.ID}}\t{{.Names}}\t{{.Ports}}" -a
# Restart-Optionen of docker-compose.yml
Among other things, the Dockercompose file regulates the behaviour when a Docker container is not currently active. This can be the case when server maintenance is due and the virtual machines are restarted. The following alternatives are available:
# GIT
The entire DVA code is managed in several GIT repositories. The following statements and notes are useful for trying out interim statuses or newer developments:
Retrieve all updates of all remotes without integrating them into local branches:
git fetch --all
Show all remote branches:
git branch -r
Show all remote and local branches:
git branch -a
To switch between different local branches:
git checkout <branch-name>

Example:
git checkout main
Display remote branch in local environment (check out local branch):
git checkout -b <lokaler-branch-name> origin/<remote-branch-name>

Example:
git checkout -b feature-branch origin/feature-branch

Alternativ (ab Git V2.23)
git switch <branch-name>